Wednesday, May 25, 2011

challenge# 5

It's time!
Time to announce two things-the guest designer for the month of June, and... of course, the next challenge.
It's really NOT easy to make a decision, a lot of people presented FANTASTIC works, and we are extremely pleased that WE CAN inspire you!
After long considerations, the Guest designer for June is:

Congratulations!
Please email me your adress to:
info@scrapaffair.com


And our next challenge# 5 will be:

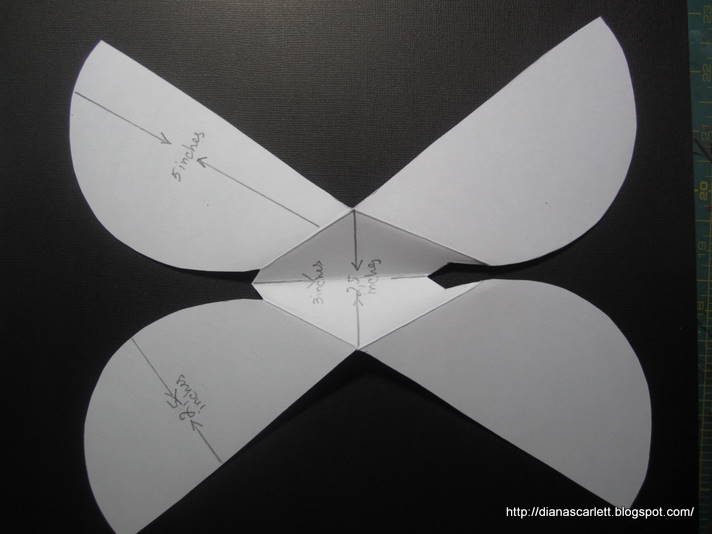
DESIGN YOUR OWN PAPER!

And to inspire you for this challenge, here are FABULOUS cards from our Design Team:

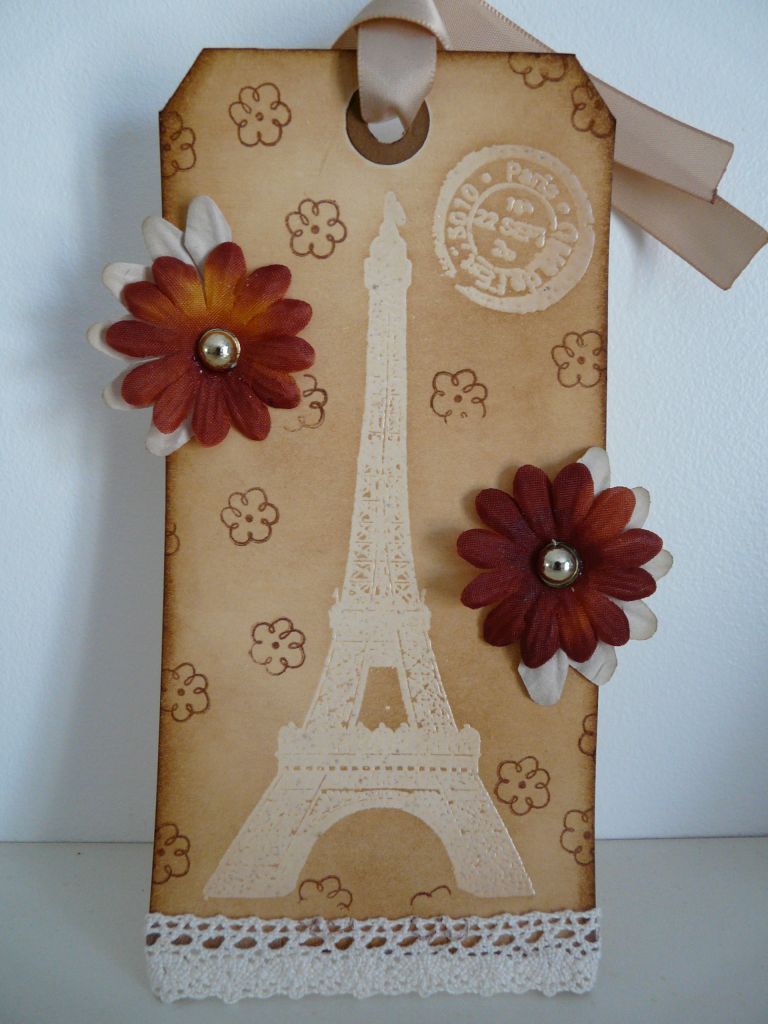
Used these items to create her card:


and I stamped the balloons with
yellow Anna Griffin ink.

Used:


Our prize for the lucky winner will be:


Melissa Frances Fancy Filigree Broach BLING


You can post your work here:
Deadline is: June 25, 2011


Monday, May 9, 2011

l"escargot Stamp Chuck the Rat

I hope everyone had fantastic Mothers Day. And been treated to something delightful.
Today Эланор-limyr is sharing some fantastic cards for inspiration.

For this card  were used:
- l"escargot Stamp "Chuck the Rat"
- Anna Griffin Designer paper "Whisper"
- Prima Botanical Collection "Far Far Away"


For this card  were used:
- l"escargot Stamp "Chuck the Rat"
- Prima Madeline Collection "Pistachio"

Friday, May 6, 2011

Lady Bug shaped card Tutorial


It seems like the most popular card I have ever made was my Lady Bug card.
I allready did tutorial on this card before, but it was in a different language. This time I will show it to you in a lot more details.

Materials you will need for this project:

2 12x12 cardstock  pages
cutting mat
good, sharp, cutting knife
sticky tape
accents
1/2" circle punch
2 "googly" eyes

Let's begin!


Fold Part "C" and glue  to part "A" and part "D" fold and glue to part "B",


Happy Crafting! Leave us a comment ;)

Thursday, May 5, 2011

New Items in our store

Hi everyone!
Just wanted to share the news that we got some very romantic and fantastic scrapbooking paper from Anna Griffin.
You can take a look here

And here is some cards From Shelly and Dianascralett using those fabulous papers:


Wednesday, May 4, 2011

Tutorial how to make a tag with Stamp / Ink / Embossing

How to make a tag with Stamp / Ink / Embossing

Material: stamps of your choice (here Aladine butterflies), Distress (here: peeled paint, dusty concord, mustard seed), Versamark ink, gold embossing powder, tag Tim Holtz, heat gun, blending tool Tim Holtz.

Pour faire un tag avec Tampon / Encre / Embossage

Matériel : tampon de votre choix (ici papillons Aladine), Distress (ici : peeled paint, dusty concord, mustard seed), encre Versamark, poudre à embosser or, tag Tim Holtz, heat gun, blending tool Tim Holtz.


Commencer à appliquer l’encre ou les encres de votre choix.

Begin to apply the ink or inks of your choice.


Tamponner avec la versamark vos motifs (ici des papillons et la définition du mot papillon). Saupoudrer de poudre à embosser, tapoter pour enlever l’excédent, et chauffez avec votre heat gun.

Stamp your designs with Versamark  (here butterflies and the definition of the word butterfly). Sprinkle embossing powder, tap off excess and heat with your heat gun.

Vous obtiendrez ceci :
This is how it will  start to look:

Ensuite, reprenez vos encres et frottez votre tag avec le blendig tool Tim Holtz, en faisant des mouvements circulaires.

Then, take your inks and rub your tag with Tim Holtz blendig tool, make circular movements.


Et voilà le résultat :

And here's the result:


Et voici un autre exemple réalisé avec de la poudre à embosser « transparent nacré », tampon Artémio, et distress vintage photo.

And here is another example made ​​with embossing powder "transparent pearl", Artemio stamp “tour eiffel”, and vintage photo distress.


et lol, j’ai absolument besoin d’une tasse de thé quand je réalise quelque chose ;-)

and lol, I absolutely need a cup of tea when I realize something;-)

Happy crafting!
Lau

LinkWithin

Related Posts Plugin for WordPress, Blogger...