Monday, April 25, 2011

Hello again!

First of all I want to Thank you each and everyone who participated in our previous challenge. I am glad Mr. Random is choosing the winner, and not me) because it would be rather hard to pick only one work that is fantastic.

Without further ado.... The winner of Daisy challenge is:

Congratulations!!!
please email me your coordinates, so I can mail your prize.
info@scrapaffair.com

And here is our challenge # 4!

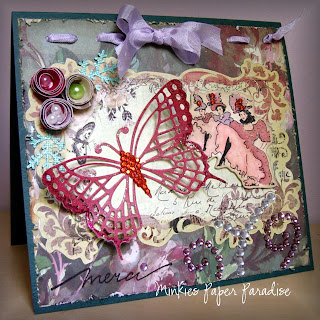
The challenge is,  to make the object with the self-made flowers
 to accesorize your scrap object, i.e. Card, page or whatever strikes your fancy, and to provide the link to the tutorial where you got the idea for your handcrafted flowers.
For this schallenge we give you a month. That means we will accept work until May 25!
And the author of best creation will win to be a  Guest Designer Team member for a month!

And here are Fabulous work of our Design Team to inspire you!


Shelly


Prima Stamp Moulin Rouge
Tutorial for flowers:


Dianascarlett used:


Tutorials for the flowers:


1. zvezdo4ka
2. zvezdo4ka
3. Mariposa
4. norik
5. kittirin
6. InessGold
7. niakriss
8. detenish
9. niakriss
10. kissinia
11. Лена Starry
12. Alesha
13. Alesha
14. niakriss
15. TOOTSIE
16. Pastila
17. doksn
18. cve
19. Shani
20. kostromka
21. eliana
22. eliana
23. Ксюмка
24. Natali
25. V.S.
26. sol'ka
27. Alinka
28. Alyonka!!!
29. niakriss
30. malena
31. Kristina
32. artv157
33. vilivine
34. Увлеченная
35. Niona
36. vilivine
37. Katia Sleepless
38. Annushka
39. niakriss
40. Настя Солне
41. niakriss
42. irina
43. Natali
44. Natali
45. len04ek
46. Katia Sleepless
47. Yukkie Jenny

Powered by... Mister Linky's Magical Widgets.

Wednesday, April 20, 2011

Butterfly Topiary and Egg


Create a magical Easter Springtime Tablescape using Martha Stewart butterfly punch, pretty papers, and paint chips from hardware store.

Materials:
Styrofoam 9"x4" cone, 4" egg
white pedestal (I used a vase)
Patterned papers: I used Melissa frances 5th Ave
Coordinating pearl-head streight pins 11/2 long, about 300
Tools:
small butterfly punch


Punch a pile of butterflies from paint chips and patterned papers-keep the piles separate.

Layer a paper butterfly over a paint chip butterfly, insert pin throgh center and into cone near bottom edge. Pinch top wings to add dimention.

Continue pinning pairs of butterflies to cone, mixing colors randomly and working from bottom to top.

Slightly twist wings to cover any gaps between butterlies.

Cover foam egg in the same way as cone.

Tuesday, April 19, 2011

Mini Cards with Prima stamps

Here are some samples of mini cards using Prima stamps Jack & Jill

Lau


Happy scrapping!

Friday, April 15, 2011

Paper Roses Tutorial

Hello everyone! I hope everyone is looking forward to a fantastic weekend.
And since our spring is late, no flowers yet, go are going to make some of our own, to brighten those dreary days.
To make a rose like this one, you will need:


Scissors
Decorative edge scrapbooking scissors
qiulling tool or something long and round to twist your paper around it.
Glue
Long strips of paper 1 inch x 11 0r 12 inches long
Chalk ink


Lets begin!
Cut a strip of paper, and color it with distress ink

At the beginning of the paper leave approximately 3 inches untouched, the rest cut evenly approximately 1 inch, make cuts on the top of the paper, where you did decorative edge.
Then in the middle of those cuts (1inch)
make cuts on the bottom.
Curl top  edges with a tool away from you.
making sort of pyramids.


Cut long strip (the 3 inches one) and little ones into "petals"

Curl long piece into s "straw"

Glue our "petals" like so
Add some color and dimensions with chalk


Gather your rose bud , piece by piece glue
the petals on the rose


Happy crafting!

Dianascarlett

Wednesday, April 13, 2011

Melissa Frances

I am happy to announce that today we got some NEW ITEMS  from Melissa Frances in your store: Scrap Affair
We been waiting for it to arrive since February, and it's not a complete order, but at least something.:)
Come in and check it out  :)
For this card I have used:
6x6 paper pad
Half pearls
Rub-on Transfers
Dianascarlett

Magic Paper

Hi everyone, this is  me Эланор-limyr:

Today I wanted to share with you a couple of my Scrap pages, which I made for my daughter Alisa
First page is about a Tram ride on the January 1st.

tramv1
Here I used Prima Botanical Collection - 12 x 12 Double Sided Paper - "My Darling", BRAND NEW ( This is the "backside" =)
The rest of my accents are – some fancy lace, a couple of real train tickets, crochet doily Stamped calendar on which I glued robins egg to accentuate the date, Stamp for journaling.
Headline I printed out on acrylic page=)
Some stitching.

My second page - is more of a "portrait" =)
The base is a - Prima Melody Collection "Troubador" - 12 x 12 Double Sided Paper - , BRAND NEW.

gard1
For title here I used  Tattered Angels chip boards, lots  and lots of various Prima flowers, a ribbon, some pebbles and punched out butterflies( Martha Stewart punches).My corner decoration and a key hole is a
Chip board from  Dusty Attic – Sort of representing a story from "Alice in Wonderland" =)))
Both Corner piece and key hole I colored using Ranger Tim Holtz Distress Ink Pad - Vintage Photo.
Well, I hope you like it, and it will inspire YOU! )

Monday, April 11, 2011

Challenge #3

Winner of last Challenge (Pink and Brown) randomly chosen is:


CONGRATULATIONS!!!
Please email me your address, so I can mail your prize to

And our challenge #3 is

Daisy!!!


Designer Team:

Dianascarlett


Эланор-limyr


Scrap'Olka


Louby


Lau


Shelly


This challenges prize will be:


You can post your entry with Mr Linky until
April 25th

Sunday, April 3, 2011

Tutorial: making background using masks and sprays

1 
For this tutorial you will need:
- ink that is acceptable for embossing;
- White or clear embossing powder;
- heating tool;
- Your choice of stamps;
-  Distress Inks a few colors;
- mini-mister;
- Glimmer mist;
Our process:
1) Stamp your image with ink that is acceptable for embossing;
2 
3 
4
2) Pour embossing powder over your stamped image, shake off excess;
5
3) Set image with heat;
6 
4) Now your image is ready, but hard to see):
7
5) At this stem we are layering our masks, I used Fancy pants ghosts, which I glued with a glue pen using just dots of glue here and there, you can make your own masks from paper, plastic, or even lace );
8 
6) Here I used empty mini mister bottle with water and a few drops of distress ink ( broken china and dusty concord ); 
9 
10
7)Spray your embossed image, and let it dry you can use heating tool to speed up the process of drying, or just a simple kitchen paper towel to remove the access of moisture;
11 
8) Remove your masks;
12 
9) In this step we use Tattered Angels spray mist all over the image ( walnut gold );
13 
14
10) Let it dry, just like we did before, or use the heating tool, this will give more depth to your work.
15 
11) Make your work to stand out even more by using Prima Melody Collection Clear Acrylic Stamps и Tim Holtz stamps, Ranger Tim Holtz Distress Ink Pad - Vintage Photo, Prima Flowers, Ranger Inkssentials Crackle Accents, to finish my page I used paper from MME and sewing machine –This is how my finished page looks like =) We made OUR OWN-designer paper!
20

Эланор-limyr

LinkWithin

Related Posts Plugin for WordPress, Blogger...