Wednesday, March 30, 2011

Anna Griffin

Today I want to share two cards one made by myself, and the other one by super talanted Shelly from Anna Griffin paper stack which is awailable at the Scrap Affair store.
Shelly used Old Paris Palette
Pack

And for my card I used English Garden Pack
Happy crafting everyone!

Sunday, March 27, 2011

Pink And Brown

Hello everyone,
Happy Monday, Scrap Affair friends. I hope you are taking a break from the cold and enjoying some crafty time. Our spring got stuck somewhere on her way to us, so we are a little anxious about that.

I hope you are ready for another fabulous challenge. The CP team cannot wait to see your interpretation of the yummy and favorite colors this week.


And this would be a prize for one lucky participant in our challenge:


Lau
used Rita's Romance Image


Louby
Used Prima stamp


ScrapOl'ka
Used Prima Moulin Rouge stamp


Shelly
Used Rita's Chuck the Rat Image


Dianascarlett
Used
on a Purse - Jill stamp


Pink card
Prima - Melody Collection - Journaling Notecards in a Box,


Prima - Celebrate Jack and Jill Collection on a round card


You can post your name and link to your work till April 11th

Monday, March 21, 2011

Flower with Stamens MK

Tutorial on how to make your own
Flower with Stamens


Items will be required:
Organza
Sprey Mist
Pink colored Thread
Wire (small gage)
Black embossing powder
Green tissue paper or florist tape
half pearls
Glue
embossing heat gun
scissors
tweezers

Here is how to do:


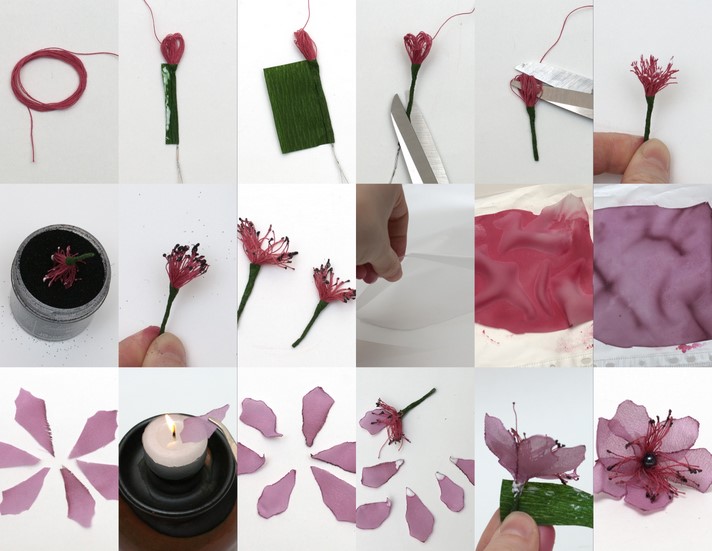
Make a small circle with thread, put it in half, and tie it in the middle with a wire-like a bow.

Wrap "naked" wire leg in a green tissue(or florist tape) and glue it, so it would look like a stem of a flower.

Cut of exess thread.

Next, we cut in half our thread circle to make our stems to stand up , dip just the ends into the glue and dip into the black embossing powder, and heat it with heat gun to settle.

In the next step you can use ready made flowers of your choice, or you can go to the next step and REALLY make flower ow your own:

All you need is small piece of organza, cut in 6 "petal" shaped pieces.

Hold each piece (one at a time) it with tweezers over tea light candle, (not too close!) or you'll burn your house down...

And singe your petals just a touch, so it Will "secure" loose thread of a material, and make it more"real"
(keep a fire extinguisher handy for this step! or at least a bowl with water)

You can use color mists to give a little dimension to your fabric before you cut it. And dry it on a "lumpy" surface, so it would create colorful pattern on organza.

Then glue "petals" to the stem, and to cover your glue use small piece of green tape to "cover" up.
Don't forget to glue a pearl in the middle of the flower, to give it that finishing touch.

And now use your creation anywhere you choose.

Happy crafting everyone!
Thanks for stopping by! I hope that this will inspire you
XOXO
ScrapOl'ka

March 21!

Yes, today is the day we anounce who will be the winner in our schetch drawing, and the winner is...:

Nata Shuk Congratulations!!!
Please e-mail me your address to: nabayzitov@yahoo.com

Monday, March 14, 2011

Anna Griffin and Prima

Our own very talanted designer team member Shelly made these two cards, to show what a fantastic cards you can make with Anna Griffin paper and stamps.
And another lovely card Shelly made with new Prima stamp from collection Jack and Jill


Both cards Shelly coloured with Distress Inks.

Friday, March 11, 2011

Tutorial mini album

Today, I want to show you how easy to transform something ORDINARY into something EXTRAORDINARY!
To create a mini book similar to this one, all you going to need is a.... GROCERY BAGS! Yes, just simple brown bags, that you can get for free in your grocery store.


Just take 4 brown grosery bags, arrenge them so the little "flaps" would be INSIDE the album. Fold in half in the middle of the bunched up bags, make two holes, using a twine or a ribbon tie them together, and... DECORATE according your style and like.


And for the extra pockets, you can make 4 tags, ot 4 "mini" pages just like I have made these:

Dianascarlett

Tuesday, March 8, 2011

Tutorial, Marbelized background Effect

Hello everyone!
Today I want to show you a fantastic way to make your own background paper.
I's simple, it's easy and... FUN!)


You will need Cardstock (Size will wary on your project)
Glimmer mist (or other mists-I used Maya Road)
Or if you don't have glimmer mists at hand Ranger reinkers will do the job. Well acctually, if you have both, mists and reinkers you can mix them to achieve desired coloring.
Plastic Ruler
SHAVING FOAM
Fork, small comb or even chopstic...)

Shake shaving cream well. Spray about 4"-square area of craft mat.
Gently swirl Glimmer mist bottle until sediment rises from the bottom and is evenly distributed.
Randomly mist shaving cream, leaving some areas white.
You can make some dots from reinker. You can also use lightly sprinkled pigment powder for extra shimmer.


At this point you can use tool of your choice ie. fork, comb os chopstic, to make swirls of color in the foam.

Now lay your cardstock into the painted shaving cream and remove it immideately.
Then with ruler "shave" all the foam, and IT"S READY!
If your paper curled up, lay it under some heavy books, it'll come back.


This method you can use with stensils.
Just lay your cadstock first, stensil on the top, and with ruler pick up shaving cream and gently spread it on the top of the stensil-like a cupcake, remove stensil to reveal the design.

Stamped designs
Use exess shaving cream mixture to "ink up" a solid image stamp. Stamp image onto card stock multiple times for a soft batik effect

Let me know, if this has been useful to you.
Dianascarlett

Monday, March 7, 2011

Our First Challenge

Welcome, hope everyone had wonderful weekend.
Today, I want to start our First challenge. Our Guest Designer
Irina Kliri, is presenting two wonderful cards, one of which is made with Rita's image that will be coming soon for sale.
The little ballerina called:" Victoria"

On March 21st we will randomly choose a winner,
and that person will get Rita's printed images on a good quality paper:

Paris Collection
Friends
Romance


Here is the sketch to inspire you:


Irina Kliri


Shelly


Dashik


Louby


Dianascarlett


Эланор-limyr:


You can post your name and link to your work till March 21st here:

Friday, March 4, 2011

New Prima stamp "Jill"

Hello everyone,
this is Nadia-Dianascarlett.
So much exitment today, opening of our store, my daugters 3! B-day, and fantastic new products.))
When I saw these stamps by Prima, I fell in love with them!
They are called Jack & Jill, and this is my 1st card with these images.
On this card I also used Anna Griffin background stamp to create my own "designer" pink roses paper. This card I made for my daughters 3rd b-day.
 
 
And the blue card was made with these items:
Anna Griffin stamp setRanger Distress Embossing Powder Broken ChinaAnd I used Distress Ink Pad - Tumbled Glass to color my background
I am really having fun with these stamps)
Aren't they perfect for Shabby style and for weddings?

Thursday, March 3, 2011

Scrap Affair store-OPENED!!!

Today is THE DAY!!! We are "opening" doors of our "Scrap Affair" store!
And to help us to celebrate we are offering some sweets to 5 Lucky people.
The rules to win it, are usual:

You post information about us in your blog and link to our store and our blog .You sign to the blog of the store as a regular reader
And wait... till April the 1st!

(nope, it's not a joke )))
I PROMISE!!!! 5 people randomly drown, will get these prizes:

1st prize
Someone very lucky will get 12 of these fantastic markers in pastel colors.
 

2nd prize

3rd prize

4th prize

5th prize
Here are the links to our store:http://www.scrapaffair.com
and our blog:http://scrapaffair.blogspot.com

LinkWithin

Related Posts Plugin for WordPress, Blogger...